

Oracle Database 11g R2 (11.2) Installation On Oracle Linux 7 (OL7) : In this article we will discuss about the installation of Oracle Database 11g R2 (11.2) Installation On Oracle Linux 7 (OL7) 64-bit. The article is based on a server installation with a minimum of 2G swap and secure Linux set to permissive. An example of this type of Linux installation can be seen here.
Oracle Linux 7 is a production release, but the Oracle Database is only supported on it from Oracle Database 11g (11.2.0.4) onward. This installation should not be used for a real system when using database versions prior to 11.2.0.4.
- Download Software
- Unzip Files
- Hosts File
- Oracle Installation Prerequisites
- Automatic Setup
- Manual Setup
- Additional Setup
- Installation
- Post Installation
Download Software :
Download the Oracle software from OTN or MOS depending on your support status.
OTN: Oracle Universal Installations (OUI) Silent Installations
Unzip Files :
unzip p13390677_112040_Linux-x86-64_1of7.zip

unzip p13390677_112040_Linux-x86-64_2of7.zip
Hosts File :
The “/etc/hosts” file must contain a fully qualified name for the server.
Example :
[root@orakldba ~]# hostname
orakldba.localdomain
[root@orakldba ~]#
[root@orakldba ~]# cat /etc/hosts
127.0.0.1 localhost localhost.localdomain localhost4 localhost4.localdomain4
::1 localhost localhost.localdomain localhost6 localhost6.localdomain6
192.159.0.103 orakldba.localdomain orakldba
Oracle Installation Prerequisites :
Perform either the Automatic Setup or the Manual Setup to complete the basic prerequisites. The Additional Setup is required for all installations.
Automatic Setup:
commands must run on root user.
yum search preinstall

yum install oracle-rdbms-server-11gR2-preinstall -y
It is probably worth doing a full update as well, but this is not strictly speaking necessary.
yum update -yManual Setup:
If you have not used the “oracle-rdbms-server-11gR2-preinstall” package to perform all prerequisites, you will need to manually perform the following setup tasks.
Added the following lines to the “/etc/sysctl.conf“ file.
fs.aio-max-nr = 1048576
fs.file-max = 6815744
kernel.shmall = 2097152
kernel.shmmax = 536870912
kernel.shmmni = 4096
# semaphores: semmsl, semmns, semopm, semmni
kernel.sem = 250 32000 100 128
net.ipv4.ip_local_port_range = 9000 65500
net.core.rmem_default=262144
net.core.rmem_max=4194304
net.core.wmem_default=262144
net.core.wmem_max=1048586
Then run this following commands on root user :
/sbin/sysctl -pAdd the following lines to this file “/etc/security/limits.conf”.
oracle soft nproc 2047
oracle hard nproc 16384
oracle soft nofile 4096
oracle hard nofile 65536
oracle soft stack 10240
Add the following line to the “/etc/pam.d/login” file, if it does not already exist.
session required pam_limits.soThe following packages are listed as required, including the 32-bit version of some of the packages. Many of the packages should be installed already.
yum install binutils -y
yum install compat-libstdc++-33 -y
yum install compat-libstdc++-33.i686 -y
yum install gcc -y
yum install gcc-c++ -y
yum install glibc -y
yum install glibc.i686 -y
yum install glibc-devel -y
yum install glibc-devel.i686 -y
yum install ksh -y
yum install libgcc -y
yum install libgcc.i686 -y
yum install libstdc++ -y
yum install libstdc++.i686 -y
yum install libstdc++-devel -y
yum install libstdc++-devel.i686 -y
yum install libaio -y
yum install libaio.i686 -y
yum install libaio-devel -y
yum install libaio-devel.i686 -y
yum install libXext -y
yum install libXext.i686 -y
yum install libXtst -y
yum install libXtst.i686 -y
yum install libX11 -y
yum install libX11.i686 -y
yum install libXau -y
yum install libXau.i686 -y
yum install libxcb -y
yum install libxcb.i686 -y
yum install libXi -y
yum install libXi.i686 -y
yum install make -y
yum install sysstat -y
yum install unixODBC -y
yum install unixODBC-devel -y
yum install zlib-devel -y
yum install elfutils-libelf-devel -y
Create the new groups and users.
groupadd -g 54321 oinstall
groupadd -g 54322 dba
groupadd -g 54323 oper


useradd -u 54321 -g oinstall -G dba,oper oracle
Set the password for the “oracle” user.
passwd oracleAdditional Setup:
The following steps must be performed, whether you did the manual or automatic setup.
Set secure Linux to disabled by editing the “/etc/selinux/config” file.
SELINUX=permissiveOnce the change is complete, restart the server or run the following command as ‘root’ user.
setenforce PermissiveIf you have the Linux firewall enabled, you will need to stop and disable it.
run this following commands on root user :
systemctl stop firewalld

systemctl disable firewalld
Create the directories in which the Oracle software will be installed.
mkdir -p /u01/app/oracle/product/11.2.0.4/db_1
chown -R oracle:oinstall /u01
chmod -R 775 /u01
Unless you are working from the console, or using SSH tunnelling, login as root and issue the following command.
xhost + <machine-name>Add the following lines at the end of the “/home/oracle/.bash_profile” file.
# Oracle Settings
export TMP=/tmp;
export TMPDIR=$TMP;
export ORACLE_HOSTNAME=orakldba.localdomain;
export ORACLE_UNQNAME=ORCL;
export ORACLE_BASE=/u01/app/oracle;
export ORACLE_HOME=$ORACLE_BASE/product/11.2.0.4/db_1;
export ORACLE_SID=ORCL;
export ORACLE_TERM=xterm;
export PATH=/usr/sbin:$PATH;
export PATH=$ORACLE_HOME/bin:$PATH;
export LD_LIBRARY_PATH=$ORACLE_HOME/lib:/lib:/usr/lib;
export CLASSPATH=$ORACLE_HOME/JRE:$ORACLE_HOME/jlib:$ORACLE_HOME/rdbms/jlib;
After settings done on .bash_profile run :
[oracle@orakldba ~]$
[oracle@orakldba ~]$ . ./.bash_profile
[oracle@orakldba ~]$
Installation:
Log into the oracle user. If you are using X emulation then set the DISPLAY environmental variable.
DISPLAY=<machine-name>:0.0; export DISPLAYStart the Oracle Universal Installer (OUI) by issuing the following command in the database directory.
[oracle@orakldba database]$ ./runInstaller
Starting Oracle Universal Installer…
Checking Temp space: must be greater than 120 MB. Actual 4290 MB Passed
Checking swap space: must be greater than 150 MB. Actual 4095 MB Passed
Checking monitor: must be configured to display at least 256 colors. Actual 16777216 Passed
Preparing to launch Oracle Universal Installer from /tmp/OraInstall2020-08-13_07-48-45PM. Please wait …[oracle@orakldba database]$ You can find the log of this install session at:
/u01/app/oraInventory/logs/installActions2020-08-13_07-48-45PM.log
Proceed with the installation of your choice:
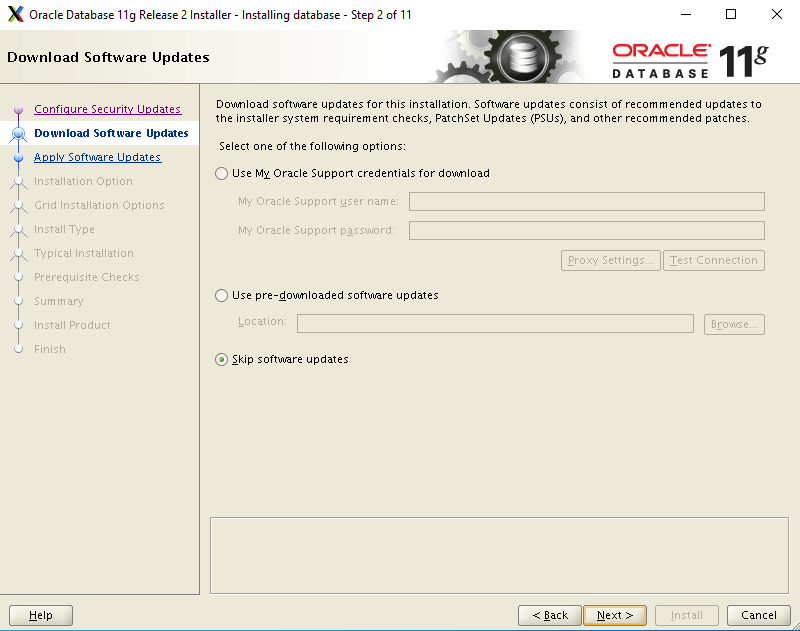
Configure Security Updates:

Software Update Options :
Installation Options :

System Class :

Installation Options :

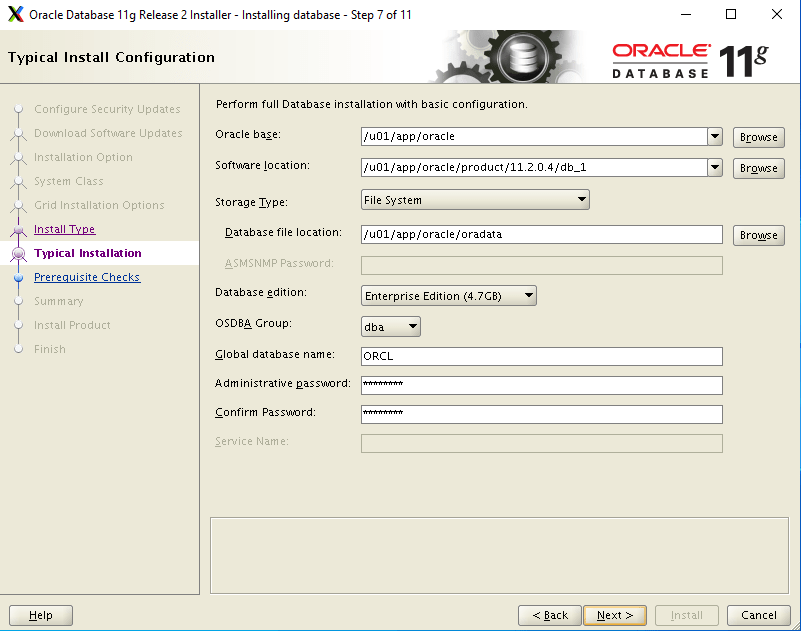
Install Type :

Install Configuration :
Create Inventory :

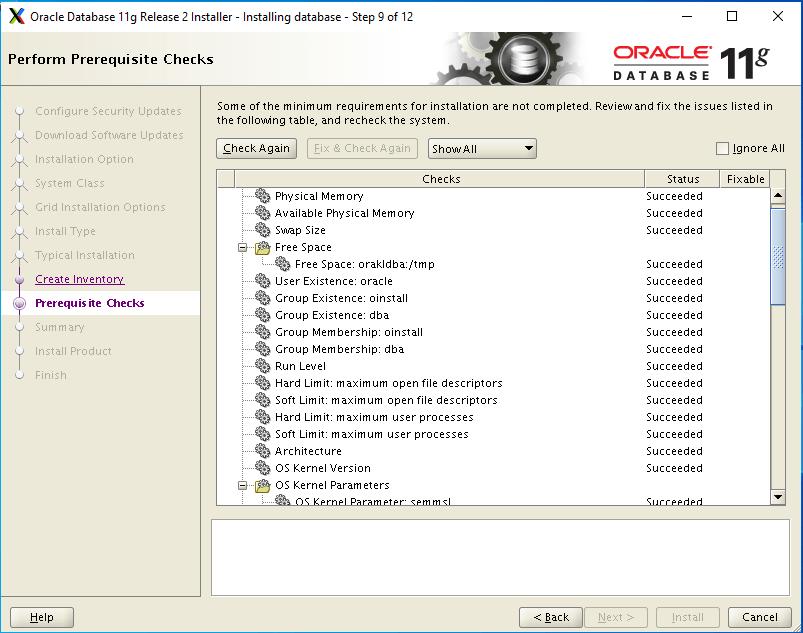
Prerequisite Checks :
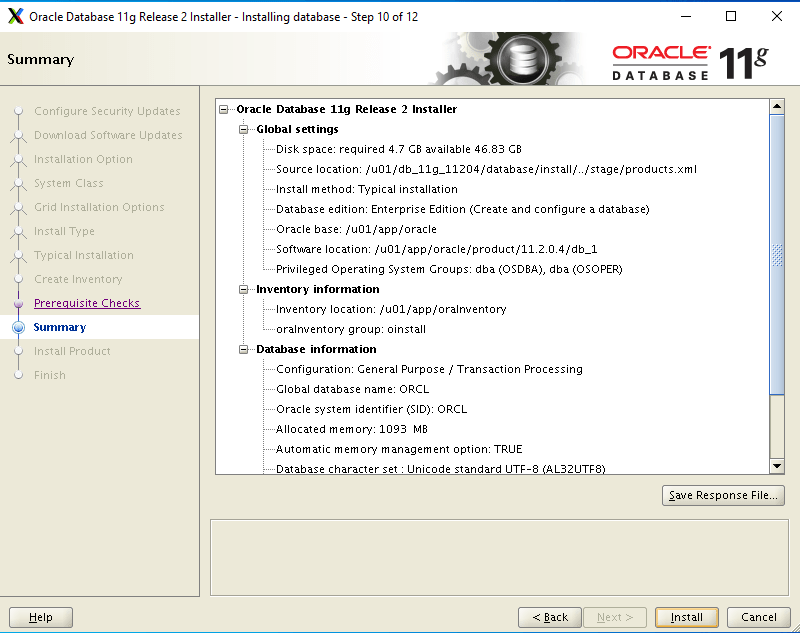
Summary :
Install Product :

Database Configuration Assistant Start :

Database Configuration Assistant Finish :

Script Execution Step :

Execute this two scripts login as root user :
/u01/app/oraInventory/orainstRoot.sh

/u01/app/oracle/product/11.2.0.4/db_1/root.sh
FINISH :

Post Installation :
Edit the “/etc/oratab” file setting the restart flag for each instance to ‘Y’.
ORCL:/u01/app/oracle/product/11.2.0.4/db_1:YAfter completed installation check database status:

I hope my written content will helped you. Your suggestions/feedback are most welcome from orakldba.com.
Keep learning… Have a great day!!!
Please comment here for your any query related to above content. You could write to mail me through : orakldba@gmail.com.
Caution: Your use of any information or materials on this website is entirely at your own risk. It is provided for educational purposes only. It has been tested internally, however, we do not guarantee that it will work for you. Ensure that you run it in your test environment before using.